
-
16 min read
How to Automate Data Entry and Extract Document Data in 2026
Tired of fixing mismatches and double entries? Learn practical ways to automate data entry and how to choose the right tool to start with.
Last updated:

TL;DR
The “double-entry spiral” happens when teams copy data from documents into spreadsheets, then retype it into ERPs—over and over when mismatches appear.
Spreadsheet automation isn’t plug-and-play at scale: formulas, validation rules, and workflows need constant upkeep as volumes and formats change.
There are four practical paths to automate data entry: (1) Docxster, (2) Excel, (3) Google Sheets, and (4) Microsoft Power Automate.
Docxster is best for mixed-format inputs (PDFs, scans, handwritten), AI extraction + validation, approvals, and pushing clean data into Sheets/Excel/ERP—plus searchable storage.
Excel and Sheets work for smaller volumes and standardized inputs, using templates + data validation + lookups (VLOOKUP/XLOOKUP) to reduce manual typing.
Power Automate is best when your workflows already live in Microsoft tools and you mainly need app-to-app routing, triggers, conditions, and approvals (not deep document understanding).
Pick your first workflow using an “automation sweet spot” matrix: high time savings + high error cost + low setup complexity + low change risk.
Design for exceptions from day one: validations, alerts, and human review checkpoints prevent automation from creating new bottlenecks.
First, you type data into Excel. Then transfer it into the ERP. Then someone spots a mismatch and you type it again. And still, the mismatches keep coming.
What should have been routine ends up swallowing hours, pulling people away from the work that actually matters. That’s the double-entry spiral—familiar, exhausting, and harder to escape as document volumes grow.
It’s why so many teams turn to automation.
But here’s the catch: with Excel or Sheets, it’s rarely plug-and-play. You need formulas, hidden tricks, and constant tweaks to keep things running.
This guide walks you through four simple ways to automate data entry, and helps you decide which tool to use to automate your data entry workflows.
4 simple ways to automate data entry
Before we explain each option in detail, here’s a table comparing all four data entry automation software options:
Software | What it does | Pros | Cons | Cost |
Docxster | End-to-end document automation: IDP/ADP, workflow builder, and secure storage | - Handles unstructured data (scanned, handwritten, digital) - Human-in-the-loop review - AI-powered search & natural language queries - Direct integration with Tally, Excel, Sheets | - May require onboarding/training to set up workflows | Forever free plan available. Paid plan starts at $45 per month. |
Microsoft Excel | Spreadsheet-based manual + semi-automated data entry | - Familiar and widely used - Flexible for small-scale automation with formulas - Low cost if already licensed | - Manual setup prone to errors - Limited scalability - No native AI or OCR capabilities | Part of Microsoft 365 (starts ~$7–$12/user/month) |
Google Sheets | Cloud-based spreadsheet with collaboration and automation via formulas | - Easy collaboration in real-time - Accessible anywhere - Simple automation with formulas and add-ons | - Limited advanced automation - No built-in OCR - Performance issues with very large data sets | Google Workspace (from $6/user/month) |
Microsoft Power Automate | Automation tool for connecting apps and automating workflows | - Strong integration with Microsoft ecosystem - Supports conditional flows and approvals - Reduces repetitive manual tasks | - Can be complex to set up - Works best with Microsoft products - Limited without premium connectors | Free tier; paid plans start ~$15/user/month |
Method 1: Docxster
Docxter is an end-to-end document automation solution that brings intelligent document processing (IDP), workflow automation, and document storage into one platform. It works with structured and unstructured documents such as:
Invoices
Bills of Lading
Handwritten documents
And helps you extract data irrespective of the type or format of the document. It relies on LLM-based templateless extraction to extract, validate, and export data in seconds.
Let’s take the example of invoice data extraction to see how Docxster automates the process end-to-end.
1. Building your invoice processing workflow
In Docxster, you begin with the drag-and-drop Workflow Builder, which lets you create multi-step, conditional processes. You can build customizable workflows based on how invoices move through your organization.
2. Import your invoices
Once you build your workflow, it's time to import your invoices. Docxster can process any invoice as long as it's in a digital format. So, if you have a handwritten document, take a picture and upload it. Or scanned and originally digital copies also work.
All you have to do is either manually upload it into our platform OR set up an email trigger (Gmail or Outlook) to import invoices as and when they come in.
3. Let Docxster extract data from your invoices
After you upload the invoice documents, Docxster extracts data using LLMs and OCR with up to 99% accuracy. It identifies both handwritten and electronic content, maps standard and custom fields, and maintains format consistency across different document types.
Since this step is fully automated, we also recognize the importance of human oversight when it is needed. That is why Docxster includes a Human-in-the-Loop feature, which allows reviewers to step in whenever confidence thresholds fall. Our system is capable of:
Routing documents for approval or review if needed
Learning from the corrections you make over the course of time
Improving accuracy as you process more invoices
4. Send validated data to your tools
After Docxster extracts your data and validates it, you can push it into your platform of choice. You can either export it in Microsoft Excel or send it to a Google Sheet. If you use a specific ERP like Tally, you can integrate it and directly push the data there.
The best part? We also maintain a copy of your extracted data within Docxster Drive. You can use the AI search feature to search for the document and within the document whenever you need.
As a result, we unlock your document data and turn it into actionable intelligence in seconds.
When to use Docxster: Ideal if your invoices arrive in multiple formats and you need them automatically extracted, validated, and routed into your systems with minimal manual effort. When NOT to use Docxster: If your invoices are already standardized and captured neatly in Excel/Sheets, where lighter automation tools can handle the job.
Method 2: Microsoft Excel
Microsoft Excel is widely used and you might prefer it too. Here’s how you can perform data entry automation in Excel:
1. Set up a clean data template
Create a master Excel file with three sheets: Customers, Products, and Invoice. Add column headers in each sheet, format them as tables (CTRL/CMD+A then CTRL/CMD+T) so updates happen automatically.

An Excel workbook with three sheets labeled Invoice, Products, and Customers
2. Use data validation to prevent mistakes
In the Invoice sheet, restrict each column to the right type of entry:
Add drop-down lists for client names and products by using Data → Data Validation → Allow: List → Source: Customer/Product table.
Set the Date column to Date format to avoid incorrect entries.

Excel Invoice sheet showing Data Validation in use with drop-down lists and date formatting
3. Automate lookup and calculations
Use formulas to pull in related information and calculate totals. For example, when a product is selected in the Invoice sheet, use VLOOKUP to fetch its unit price directly from the Products table instead of typing it manually.

Excel Invoice sheet using VLOOKUP to calculate totals
Then link this value to the Quantity column so Excel multiplies the two and returns the Total Price for that line. You can repeat this for every row, ensuring all invoices calculate automatically as soon as you choose a product and enter a quantity.
When to use Excel: If your invoice volume is small and your team is comfortable handling manual data entry. When NOT to use Excel: Avoid if your invoice volume is high or formats vary a lot.
Method 3: Google Sheets
The steps to automate data entry are almost similar to those in Excel. Here is how to automate data entry in Google Sheets:
1. Set up a clean data template
Create a Google Sheet with three tabs: Customers, Products, and Invoice.
Add clear column headers in each tab and keep the data in structured table form. This way, any updates you make in Customers or Products can be used directly in the Invoice tab without extra setup.

Google Sheet with tabs for Invoice, Products, and Customers used as a clean data template
2. Use Data Validation to prevent mistakes
In the Invoice tab, add drop-downs for client names and products using Data → Data validation → From a range, pointing to the Customers or Products tab. Apply the same for Products so entries stay consistent even as you add new items. Format the Date column as Date so Sheets only accepts valid dates and rejects incorrect inputs.

Google Sheets Invoice tab with Data Validation drop-downs
3. Automate lookups and calculations
Use VLOOKUP (or XLOOKUP) to fetch unit prices from the Products tab whenever a product is selected. Link this to the Quantity column so the total is calculated automatically for each row. As you add more rows, the invoice keeps updating without needing manual changes.

Google Sheets Invoice tab using VLOOKUP to calculate totals automatically
When to use Google Sheets: If your team works in the Google workspace and is capable of handling repeated manual entries. When NOT to use Google Sheets: Not suitable if your invoices come in mixed formats (PDFs, scans) or if you need advanced workflow routing and approvals.
Method 4: Microsoft Power Automate
Microsoft Power Automate is a no-code platform that helps you connect apps and services, build workflows, and eliminate repetitive manual tasks. Let’s look at how it can be used to automate invoice data entry step by step:
1. Connect your data sources
Go to Data → Connections and link the services you’ll use for invoices, such as OneDrive, Excel Online, Outlook, or SharePoint.
🔥 Pro tip: If you’re using Excel, make sure your invoice data is in a table so Power Automate can read it. If you’re on SharePoint, set up an Invoice list or a dedicated folder.
2. Set up a trigger to start the automation
Go to Create → Automated cloud flow, give it a name, and tell Power Automate what should set things in motion.
For example, “whenever a new invoice file lands in this SharePoint folder” or “whenever a new row is added to my Excel sheet.” From here on, that event is the button that kicks off the process.

Power Automate screen showing a trigger setup for starting automation
3. Define the actions
Now you need to decide what should happen after the trigger.
Click + Add an action and choose the next step. For example, Power Automate can send an invoice by email, or log the details in a central Excel sheet. These actions save you from having to repeat the same clicks over and over.
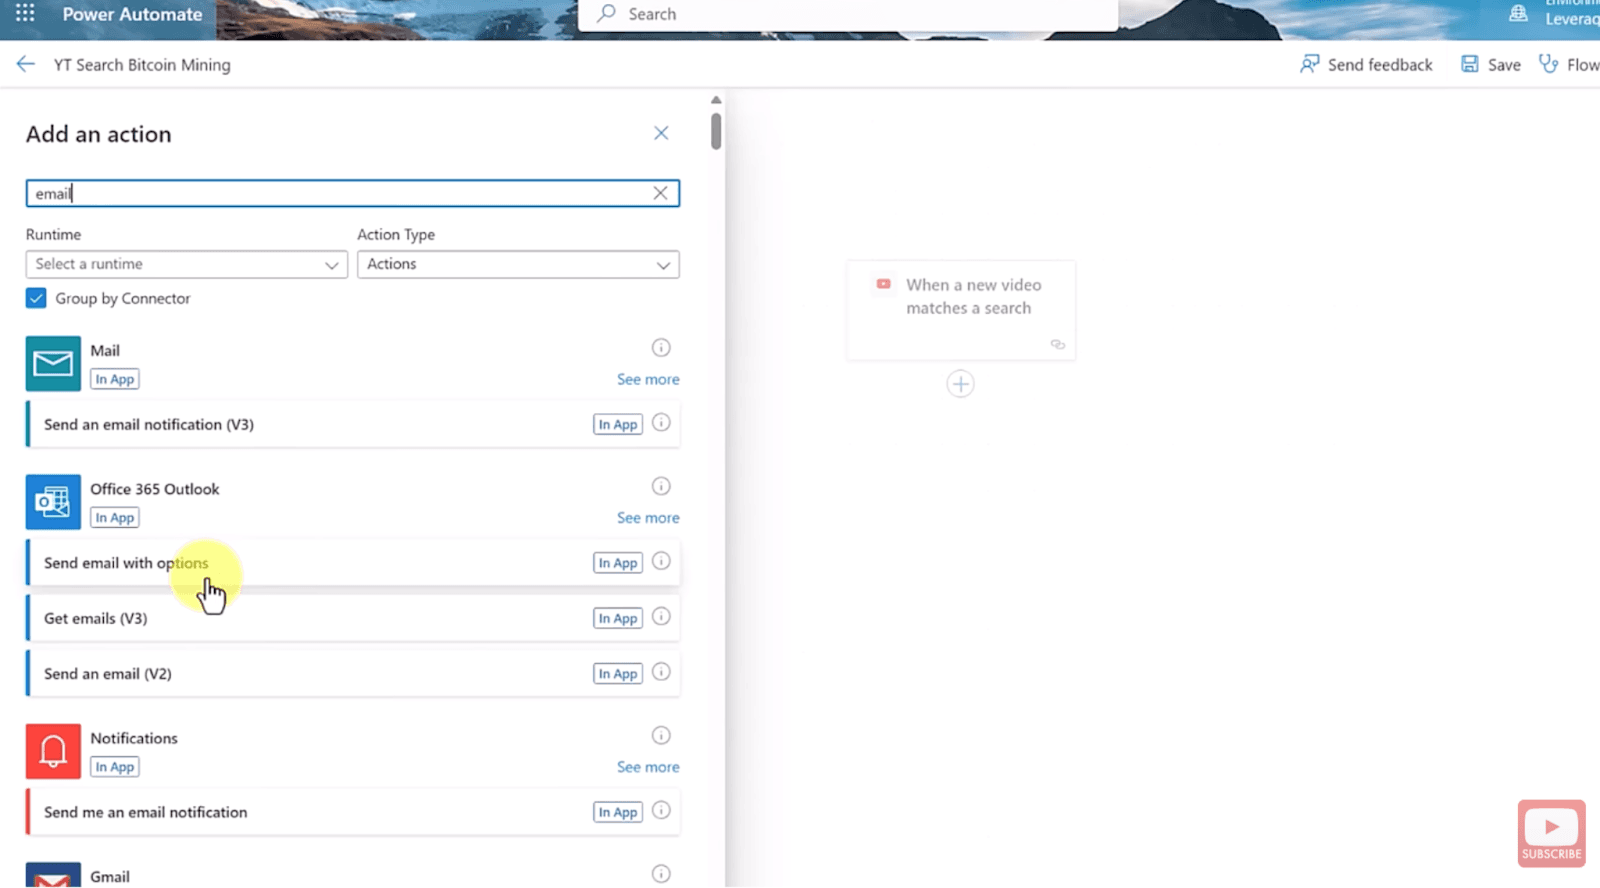
Power Automate screen showing options to define an action after the trigger
4. Add conditions and approvals
With Power Automate, you can also set conditions and approvals in case invoices don’t all follow the same path.
You can add a condition so that, say, invoices over a certain amount go to a manager for approval first. If the amount is lower, the flow can continue straight to sending or logging without interruption.
5. Test and run automatically
Before you trust the flow, test it with a sample invoice. If it runs as expected, save and switch it on. From then on, each time your trigger fires, the process handles itself end to end.
When to use Power Automate: Best suited for teams already working within the Microsoft ecosystem and don't need intelligent document processing. When NOT to use Power Automate: Not ideal if your organization isn’t invested in Microsoft tools or if you don’t have a technical team to set up and maintain flows.
How to choose the right workflows to automate
When several workflows compete for attention, choosing where to begin can feel overwhelming. To make that choice easier, we’ve put together a short guide that shows you how to find the right starting point:
1. Find your automation sweet spot
As a team leader, your instinct might be to pick the most complex workflow. But as Ramzy Syed, has put it:
"Don’t start with your most complex document. Start with one process you’re sick of doing manually. You might have 20 different processes in your company that can be automated, but try with one, see how it’s working, see how your employees are adapting to it. You will automatically make decisions from there."
— Ramzy Syed, Founder, Docxster
Think of the sweet spot as the best of both worlds: straightforward to automate, but impactful enough to make a difference. Begin there, and you’ll not only see immediate results, you’ll also build confidence for when it’s time to tackle the complex workflows.
To make choosing a workflow easier, here’s a matrix you can use:
List all the document-heavy processes you might want to automate.
Now, score each one from 1 (low) to 5 (high) for:
Impact on productivity – How much time would automation save per week?
Error reduction potential – How costly are mistakes in this process today?
Implementation complexity – How easy is it to set up in a no-code platform? (Lower complexity = higher score)
Change management risk – Will this disrupt other systems or people’s work? (Lower risk = higher score)
Add up the scores for each process.
The winner is clear: a workflow with high impact, strong error reduction, low complexity, and minimal risk. That’s your automation sweet spot, and the best place to start.
🔥 Pro tip: Start with one workflow to minimize risk, make learning manageable, and see early results without overcommitting. You can also track a few essentials like time saved, error reduction, and employee adoption as you go. These early KPIs prove automation works and give you the confidence to expand into other workflows with clarity.
2. Choose a tool that meets your team’s need
An automation project can fail before it even begins if the tool doesn’t fit the workflow. The wrong choice doesn’t just waste money, it creates more work than it removes.
The right tool, on the other hand, should meet your process needs and be simple enough for non-technical users to set up without IT. If your team can’t run it on their own, they will stop adopting it.
That’s why matching tools to task complexity is critical. At a minimum, look for:
OCR + validation: To turn paper invoices or handwritten forms into reliable digital data.
Schema mapping: To place that data in the correct ERP or fields, without manual fixing.
Role-based routing: To handle approvals and multi-step processes with zero bottlenecks.
Export flexibility: To send data wherever it needs to go: Excel, email, ERP, or API.
With these capabilities in place, the tool doesn’t just “work”, it fits. And when the fit is right, automation scales smoothly across your organization.
3. Plan for exceptions from day one
A form may arrive incomplete, an invoice might contain an unusual field, or data could be captured incorrectly. Without a plan for handling these cases, the efficiency you gain from automation can quickly erode.
The way forward is to design for exceptions from the start. That means adding:
Validation checks: To flag missing or inconsistent data before it enters your system.
Alerts: To direct attention to the right people at the right time.
Human review checkpoints: To manage cases that automation alone cannot resolve.
🔥 Pro tip: Use Docxster’s HITL feature to flag outliers and route them to a human reviewer to cross-check everything.
Why Docxster is the right choice for data entry automation
Excel and Google Sheets can get you started, but they still rely on manual effort and patchwork formulas that break as the document volume grows. Power Automate takes you further, but it often needs IT support and lengthy setups to keep things running smoothly.
None of these methods truly free your team from the double-entry spiral, they just shift the burden around.
Docxster was built to close that gap. As Syed puts it:
“If you’ve created your own Facebook profile, you should be able to make your own automation.”
That’s the principle we’ve built Docxster on. Data entry automation shouldn’t feel like a complex workflow—but something’s that second nature to your team.
Ready to see how simple and scalable data entry automation can be?
FAQs: Automating Data Entry
1. What is the “double-entry spiral” in finance and operations?
It’s the cycle where teams enter data in spreadsheets, re-enter it into an ERP, then re-enter again when mismatches or missing fields are discovered—wasting hours and increasing risk as volumes grow.
2. What are the simplest ways to automate data entry?
Four common options are: (1) end-to-end document automation platforms (AI extraction + validation + workflows), (2) Excel automation with templates, validation, and lookups, (3) Google Sheets automation with validation + formulas, and (4) app-to-app automation with Microsoft Power Automate.
3. When should I use Docxster instead of Excel or Google Sheets?
Use Docxster when your inputs are messy or varied (PDFs, scans, handwritten documents), when you need validation + approvals, and when you want extracted data to flow into Sheets/Excel/ERP without manual retyping.
4. When is Excel the “right” automation tool?
Excel is a good fit for low-to-moderate volumes and standardized inputs where the team can reliably use data validation, tables, and formulas (like VLOOKUP/XLOOKUP) to reduce errors and speed up entry.
5. When is Google Sheets the “right” automation tool?
Sheets is ideal when collaboration matters (multiple editors, real-time updates) and your data entry is mostly structured. It works well with validation rules, formulas, and add-ons—but it’s not designed for extracting data from PDFs/scans by itself.
6. What is Microsoft Power Automate best for?
Power Automate is best for connecting Microsoft tools (Outlook, SharePoint, OneDrive, Excel Online) and automating triggers, routing, approvals, and logging—especially when your “data” already exists digitally in structured form.
7. Why do spreadsheet automations break over time?
They often rely on assumptions (fixed columns, consistent naming, stable formats). As vendors change layouts, teams add new fields, or volume spikes, formulas and manual rules need constant tweaking—and errors creep back in.
8. How do I choose the first workflow to automate?
Start with the workflow you’re most “sick of doing manually,” then score candidates on (a) time saved, (b) error cost, (c) implementation simplicity, and (d) change risk. Pick the one with high impact and low complexity.
9. What should I build into automation from day one to handle exceptions?
Add validation checks, alerts, and human review checkpoints (HITL) so incomplete documents, unusual fields, and low-confidence extractions don’t silently flow into your ERP and create downstream cleanup work.
10. What features matter most if I want to eliminate retyping into my ERP?
Look for OCR/AI extraction (for documents), schema/field mapping (so data lands in the correct ERP fields), validation rules, role-based routing for approvals, and flexible exports/integrations (Sheets, Excel, APIs, ERP connectors).
Turn documents into decisions.
See how Docxster gets you from inbox to insight in minutes, not days. Bring your toughest workflow — we'll show you what it looks like solved.